Burnley Tile Cleaning

Burnley Tile Cleaning

Welcome to my Work History archive where you will find examples of the cleaning and renovation of tiles carried out in Burnley.

Limestone Floor Cleaning and Polishing Colne

Polishing and Sealing a Dull Limestone Tiled Floor in Colne Burnley

Earlier this year I received an enquiry from Colne regarding a Limestone tiled floor that needed attention. The floor had been installed a few years earlier throughout much of the ground floor including the utility, hallway and large kitchen diner. It was last sealed by the installer and since then it had become quite soiled in parts, particularly the heavy traffic areas and grout. The client hoped for a lighter finish, with a light sheen/semi honed finish to the stone and cleaner grout.

Limestone Floor Before Cleaning Colne

The protective sealer had clearly worn down and was now letting dirt into the pores of the stone making it difficult to clean effectively. After surveying the floors, I recommended burnishing the Limestone with a set of diamond pads and then re-sealing the stone with a suitable modern sealer that would give the finish they were looking for. Happy with my quote we set a date to start the work.

Limestone Floor Before Cleaning Colne Limestone Floor Before Cleaning Colne

Cleaning and Polishing a Limestone Tiled Floor in Colne

Diamond burnishing pads are the best tool for renovating honed stone floors like Limestone and after setting up the equipment work started with the application of a coarse 400-grit pad.

Limestone Floor During Cleaning Equipment Setup Colne

The pad is fitted to a weighted buffing machine and applied to the floor at low speed with water to lubricate the process. This coarse pad strips off old sealers and cleans the stone and is run over each tile three times, once done the resultant soiling is rinsed off with water and extracted with a wet vacuum.

The burnishing process was then continued with finer 800 and 1500-grit pads which slowly restore a honed finish to the stone. After each pad is run over the floor the dirty water was extracted using the wet vacuum as before.

The next step was to scrub the grout joints using a medium dilution of Tile Doctor Pro-Clean. The solution is left to soak into the grout for ten minutes before being scrubbed in by hand with a stiff brush. Once done the now dirty solution was rinsed off with more water and extracted using the very useful wet vacuum.

The floor was then reviewed and any issues spot cleaned using a repeat of the various processes. Part of this work included hand finishing the edges and corners using a set of small hand burnishing blocks of different grits.

A lot of water was used during the cleaning process and the floor needs to be dry before applying the sealer. So once all the work was done the floor was dried as much as possible with the wet vacuum and then left to dry out for 24 hours.

Sealing a Polished Limestone Tiled Floor in Colne

On my return I set about polishing the Limestone using the last pad in the burnishing pad set which is an extra fine 3000-grit. This last pad is applied to the floor dry with only a little water sprayed onto the stone as you progress. It adds a lovely deep shine to the Limestone and leaves the floor dry and ready to be sealed.

To finish Tile Doctor Ultra-Seal was then applied to the Limestone, this is an impregnating sealer that provides a natural look finish. It works by soaking into the stone occupying the pores and thereby preventing dirt from becoming ingrained there, this ensures dirt remains on the surface where it can be easily cleaned away.

Limestone Floor After Cleaning and Polishing Colne Limestone Floor After Cleaning and Polishing Colne

The floor looked much cleaner and lighter once done and my client was very happy with the result and left the following comment on our review page:

“Thoroughly professional job from start to finish with fantastic results!”

Limestone Floor After Cleaning and Polishing Colne Limestone Floor After Cleaning and Polishing Colne

For aftercare I recommended using Tile Doctor Stone Soap for polished stone floors like this, it is a gentle effective cleaner that’s ideal for cleaning sealed floors and helps to maintain the patina.

Limestone Floor After Cleaning and Polishing Colne


Professional Restoration of a Limestone Tiled Ground Floor in South Lancashire

Polishing and Sealing a Dull Limestone Tiled Floor in Colne Burnley Read More »

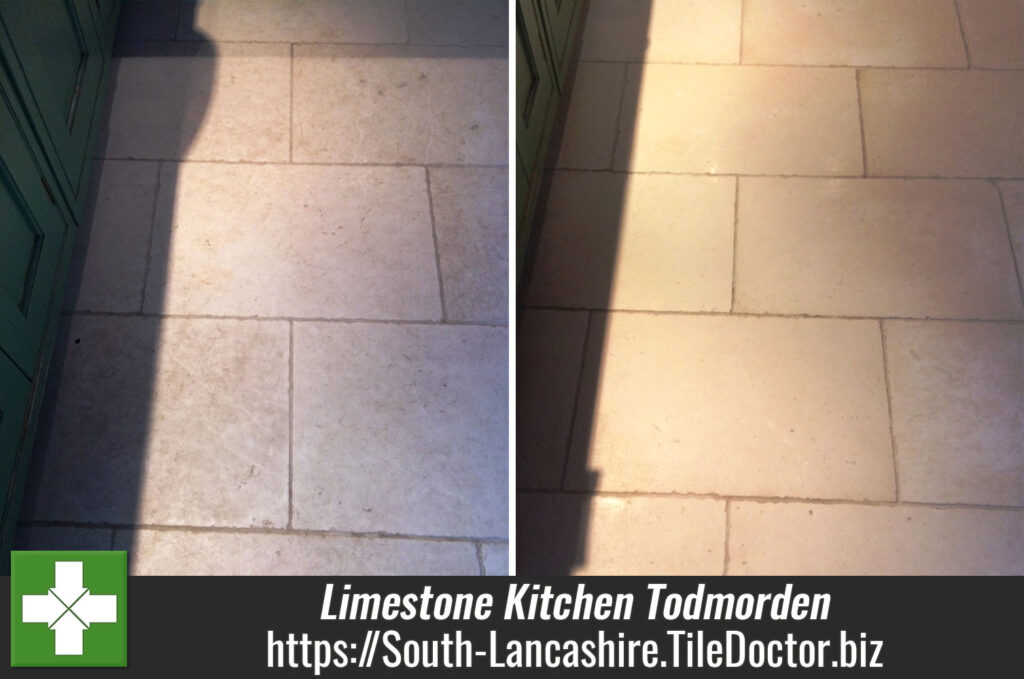
Etched and Damaged Limestone Kitchen Tiles Restored in Todmorden

Etched and Damaged Limestone Kitchen Tiles Restored in Todmorden

There is perhaps nothing more frustrating as a homeowner than trying to keep your house clean, only to accidentally make things worse. This is often due to a misunderstanding around suitable cleaning products for different types of surfaces.

In the case of natural stone tiles using the right products is imperative and you really should read the label, as the wrong product can actively damage the floor. A customer of mine, who lives in Todmorden, a market town in Pennines, found this out the hard way. Just six months earlier, the customer had installed a new Limestone tiled floor in the Kitchen but was becoming increasingly unhappy with it as they found it difficult to keep it clean.

Nothing they could do seemed to help. To make matters worse, they had not been given any information on the correct maintenance of the floor by the original flooring company. As a result, they had tried to use several unsafe cleaning products including bleach and CIF. These acidic products had stripped away the sealer that was protecting the stone, and caused etching marks on the stone. This made cleaning the stone with normal methods nearly impossible.

Limestone Floor Before Cleaning Todmorden Farmhouse Limestone Floor Before Cleaning Todmorden Farmhouse

The only method that could possibly save the tiles is one used by Tile Doctor, which is known as burnishing. When the customer contacted me, I suggested that this would be the best course of action. Given that the customer was on the verge of giving up, they were happy to book in the work.

Burnishing a Damaged Limestone Tiled Floor

To restore the Limestone tiles back to their original condition, I used the Tile Doctor four-pad burnishing system. In this system, we use four diamond encrusted burnishing pads of varying grits to grind away the damaged layer of stone, before slowing honing the surface and restoring the polished finish.

Depending on the size of the pads and the size of the affect area, they are either fitted to a handheld machine or to a larger rotary machine and applied directly to the surface with a small amount of water as lubrication.

I started with the first of the four pads, which is a Coarse 400 grit pad and is designed to strip off any old sealers and to grind away the marks caused by the etching. I then proceeded to work my way in sequence through the next three pads, moving from Medium 800 grit, on to Fine 1500 grit and finally to Very Fine 3000 grit. I paused to rinse the floor with fresh water between each pad to remove any resulting soil and mess.

The combination of diamond encrusted burnishing pads was highly effective in grinding out any scratches and achieved a high-quality polished finish to ensure the floor looked perfect.

Sealing a Polished Limestone Tiled Floor

Once it had been left to dry, I sealed the Limestone tile was sealed with Tile Doctor Ultra-Seal, which is a premium solvent-based penetrating sealer which is formulated to provide maximum stain protection and to leave a no-sheen, natural look finish.

The customer very happy indeed with the result after believing nothing could be done to remedy the situation. I ensured they received the right advice on how to keep it clean until it would need routine maintenance from a professional tile cleaning company.

Limestone Floor After Cleaning Todmorden Farmhouse Limestone Floor After Cleaning Todmorden Farmhouse


Restoring a Damaged and Etched Limestone Tiled Floor in the Pennines

Etched and Damaged Limestone Kitchen Tiles Restored in Todmorden Read More »

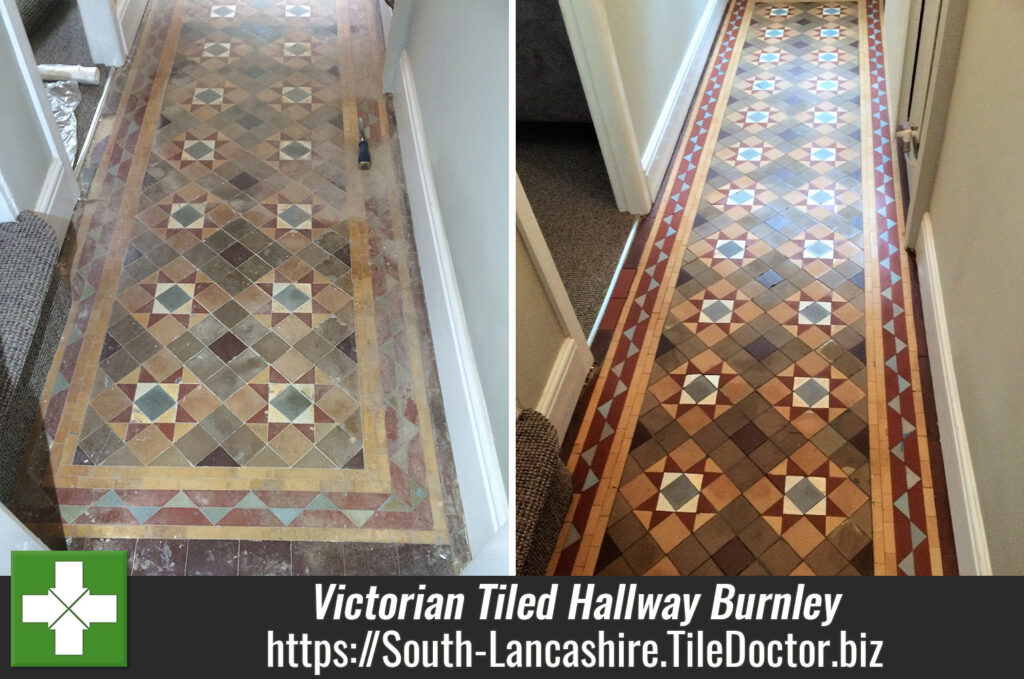
Victorian Tiled Hallway Floor Renovated for a Property Investor in Burnley

Victorian Tiled Hallway Floor Renovated for a Property Investor in Burnley

A property investor contacted Tile Doctor to see if we could help renovate a property that was to be sold in few weeks’ time. To get maximum value from the investment she wanted to preserve the character and period features of the house including the Victorian Tiled Hallway floor, which as you can see from the photograph below was in need a bit of TLC!.

Victorian tiled floors and other period features have become very popular in recent years and are often discovered under hallway carpets covered in years of dirt. Fortunately, they are very resilient and with the right techniques and products can be restored back to their former glory.

Victorian Tiles Before Renovation Burnley
On our initial visit I conducted a survey of the floor to check its condition and work out the most suitable products and methods to employ to restore it. One of the main concerns we have with these old floors is damp as damp-proof membranes were not invented until relatively recently. I have a damp meter to check for this and it did indicate high moisture levels which isn’t really an issue for cleaning the floor but would restrict our choice of sealer to those which are fully breathable and allow moisture to rise-up through the tile. We agreed a price and schedule with the customer and within two weeks we were able to start the work.

Cleaning an Original Victorian Tiled Hallway Floor

The floor was in quite a state, made worse I suspect by recent restoration work by other contractors who unfortunately didn’t take as much care with the floor as the could have done.

After protecting the skirting boards and carpets with film work got underway starting by applying a strong dilution of Tile Doctor Remove and Go to the floor to strip away old sealers and other coatings. This product also helps to break down the paint stains on the surface of the tile, though I also used a handheld scraper, as well as a rotary machine fitted with a black scrubbing pad, to speed up the process. The resultant slurry was rinsed off the floor with water and extracted using a wet vacuum.

With the floor clean of coatings, the next step was to deep clean the tiles with a medium dilution of Tile Doctor Pro-Clean which is an effective Tile and Grout cleaning product that deeply cleans away ingrained stains. Again, we used a black scrubbing pad fitted to a rotary machine to make the job easier. Corners were tough to tackle with a machine, so we had to do them by hand.
The floor was given a final rinse to remove any soil and trace of cleaning product and the wet vacuum was used a final time to extract as much moisture out of the floor as possible. Upon finishing the cleaning, we left the floor for a few days, so it could dry out fully.

Dealing with Efflorescence

When we came back to seal the floor we noticed problems with white salt deposits coming to the surface of the tile a problem known as efflorescence. I had suspected this might become an issue but there was no indication of it happening before so was not overly concerned at the time. However, it meant I could not seal the floor as planned until the efflorescence had been dealt with. Fortunately salts like these can be treated and to resolve the problem I gave the floor a wipe with a solution of Tile Doctor Acid Gel which is a blend of phosphoric and hydrochloric acids in a gel form, formulated to remove grout haze (grout smears) and treat efflorescence. Once this was done the floor was given a light rinse and dried again.

Sealing an Original Victorian Tiled Hallway Floor

I left the floor to dry again for a few more days and on my return, I was pleased to see the problem had not resurfaced and I was able to complete the restoration with the application of a sealer.

To seal the tiles, I used a couple of coats of Tile Doctor Colour Grow, which is a penetrating sealer designed to soak into the pores of the clay thus preventing dirt from becoming ingrained whilst additionally enhancing the colours in the tile. The sealer really deepened the colours in the tile bringing them to life and with Colour Grow being fully breathable there shouldn’t be any issues with damp becoming trapped under the tile and causing issues later.

The customer was delighted with the results (see feedback below) and the work we did should more than pay for itself when the house goes on the market.

“Thoroughly impressed with Kamila, she was so lovely, professional and thorough! Our tiles look amazing and I was especially happy with how quick she sorted that floor out from the first email I sent. Janice M., Burnley”

Victorian Tiled After Renovation Burnley
 

Professional Restoration of an Old Victorian Tiled Hallway in South Lancashire

Victorian Tiled Hallway Floor Renovated for a Property Investor in Burnley Read More »

=================================

South Lancashire Tile Doctor

================================= Read More »

Scroll to Top