Flaking Flagstone Floor Kitchen Restored to New in Syke Rochdale
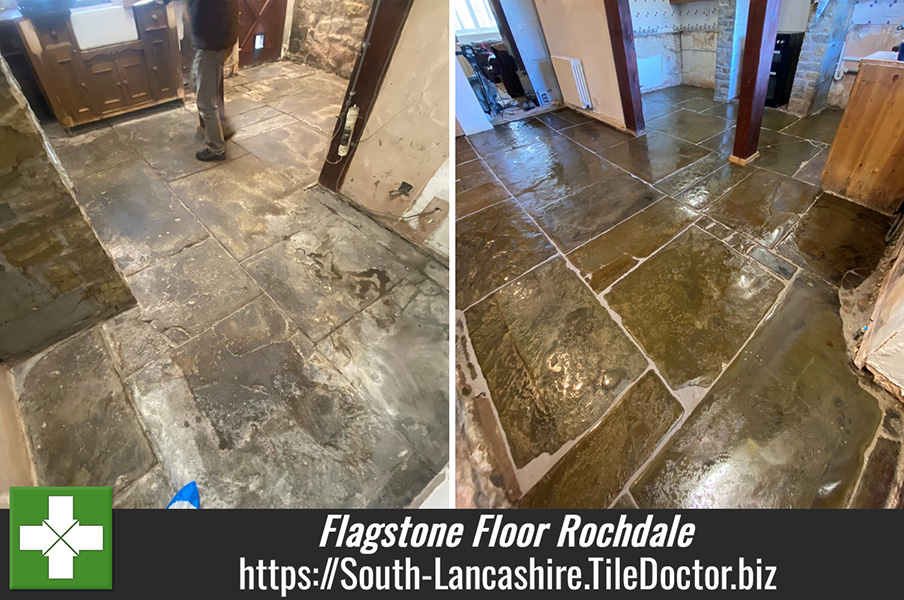
A homeowner from the Syke area of Rochdale contacted us with some pictures of their Flagstone kitchen floor. Unhappy with the appearance of the flagstone and having seen some of the work we had done previously he was keen to see if they could be restored, especially as many of the flags had flaked over the years on their upper surface.

Another factor was that he was planning to have a new kitchen installed and quite sensibly felt it would be best to deal with the floor first. He wanted to retain the flooring as it was in keeping with his home which was a very old and lovely terraced cottage.

Keen to explore the options I was asked to come over, survey the floor and come up with quotes for sprucing up the flags and making them a little easier to live with. After discussing the condition, requirements and budget we agreed to survey the floor with a view to milling the surface, cleaning, repointing and sealing the floor.
Following the survey, we booked in dates to mill approx. 25m2 of flagstone flooring in the kitchen using coarse grit diamond milling pads. The date was timed to fit in with the old kitchen being removed and before the new kitchen was to be installed.
Restorative Cleaning of Flagstones
The process to get the floor clean started with running a 50-Grit flexi milling pad over each flagstone several times using only water for lubrication. This very coarse pad cuts into the surface of the flagstone removing a thin layer of stone and revealing fresh untainted stone underneath, this also removes any flaking. After this the floor was rinsed with more water and the soiling extracted with a wet vacuum.
The floor was then deep cleaned using a strong dilution of Tile Doctor Remove and Go scrubbed in with a silicon carbide brush which works well on rough floors as the brush gets into all the crevices and grout lines. Once the whole floor had been treated in this way the solution was rinsed off with water and extracted again using the wet vacuum.
This milling process was then continued using a variety of gritted pads. Gradually the finer pads slowly improved the surface of the stone.
Next the remaining old, loose mortar was removed, this was a slow process as you have to be careful not to chip the adjacent stone, however it was helped by the fact that a lot of the grouting was cracked anyway.
A lot of water was used cleaning the floor so to counter any latent efflorescence the floor was given an acid rinse using Tile Doctor Grout Clean-up worked in with 200-grit soft burnishing pad. This was then rinsed off the floor and extracted with the wet vacuum.
To further improve the condition of the flagstone the floor was then burnished using a 400-grit burnishing pad lubricated with water. After another rinse and extraction, work started on repointing the floor using a modern permeable epoxy joint mortar.
Sealing a Flagstone Tiled Kitchen
Once the floor was dry, protection was added using Tile Doctor X-Tra Seal which is an oil-based fully breathable sealer that enhances the appearance of the flagstone. Using a breathable sealer is important on old floors of this type as they don’t have a damp proof membrane that will prevent moisture rising through the foundation. Excess sealer was then removed from the floor using a white buffing pad which also further brought up the appearance of the stone.

The new sealer will prevent dirt from becoming ingrained in the pores of the stone, keeping it on the surface where it can be easily cleaned away. Once complete the floor was looked transformed by the process and my client was over the moon with the difference and left the following feedback:
“I’m amazed at the transformation to my flagged kitchen floor (I thought it was a lost cause). Kevin gave me top drawer service, explaining what he was doing and what I needed to do going forward. ”
 |
 |
For aftercare cleaning I recommended the use of Tile Doctor Neutral Tile Cleaner which is a mild yet effective cleaner that won’t affect the new sealer.
Professional Restoration of a Flagstone Tiled Kitchen in South Lancashire
Flaking Flagstone Floor Kitchen Restored to New in Syke Rochdale Read More »