Lancashire

Kerridge Sandstone Kitchen Floor Renovation Rawtenstall Rossendale

Smooth Kerridge Sandstone Tiled Kitchen Floor Renovated in Rawtenstall

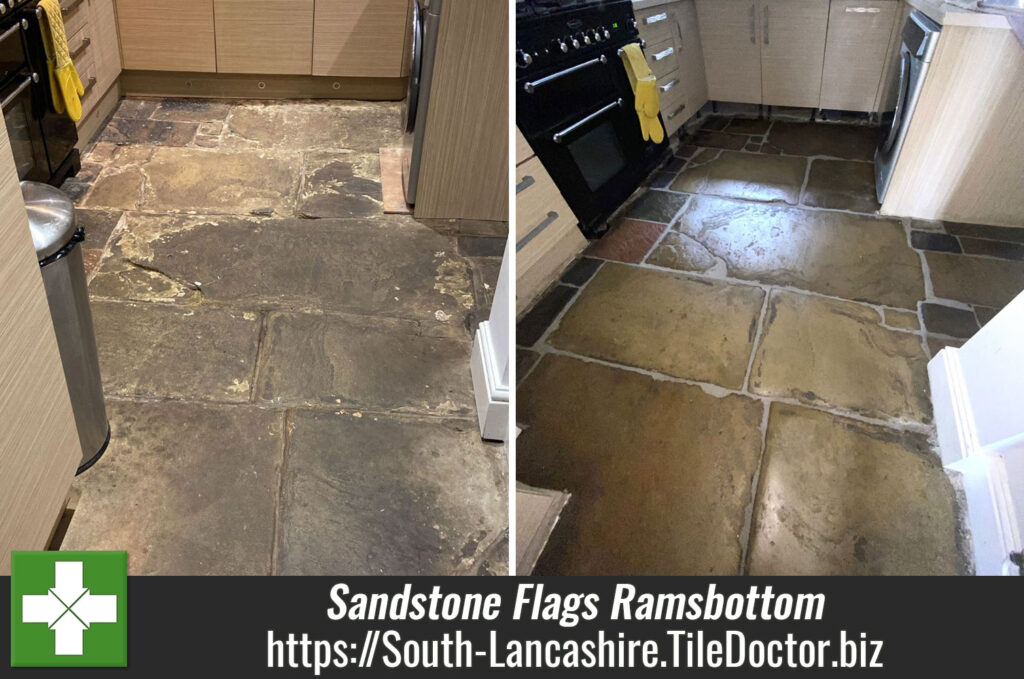
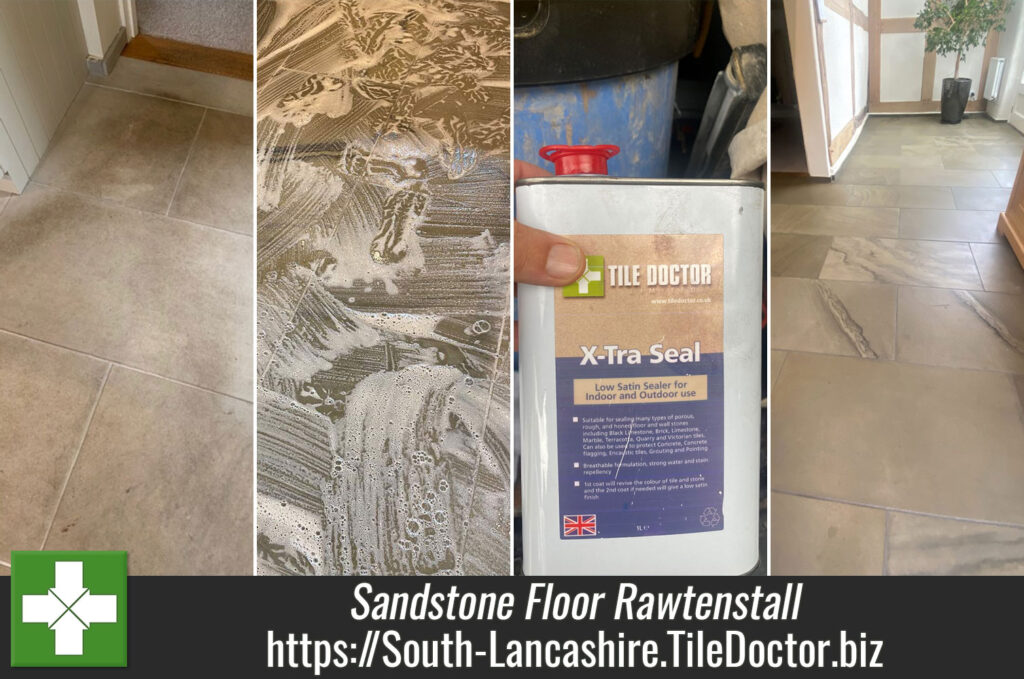
We were contacted by a new homeowner in Rawtenstall, which is in the borough of Rossendale, who having just moved in decided to contact us about her Sandstone kitchen floor. The stone floor was terribly dirty and was proving impossible to clean.

The stone was very smooth and having discussed it locally she had been told it was Kerridge Sandstone. I suspected from our conversations that it had not been sealed successfully as apparently even water from wet shoes would soak straight into the stone and cause staining.

Kerridge Sandstone Kitchen Floor Before Cleaning Rawtenstall Rossendale

I went over to survey the floor and discuss its renovation. Whilst there I was able to confirm the issues with the sealer and recommended deep cleaning the stone floor, stripping off what was left of the old sealer in the process and then re-sealing with something more durable.

Kerridge Sandstone Kitchen Floor Before Cleaning Rawtenstall Rossendale Kerridge Sandstone Kitchen Floor Before Cleaning Rawtenstall Rossendale

I worked out a renovation plan and price, which was agreed, and scheduled a date for the work to start. Due to the unknown history of the floor, I expected the plan was going to require some adjustments to achieve the best result.

Stripping and Cleaning a Kerridge Sandstone Tiled Kitchen Floor

Working in sections the initial focus was to get the floor clean which started by soaking the sandstone floor in a strong solution of Tile Doctor Remove and Go. This product is a coatings remover and was left it to soak into the stone for ten minutes so it could get a head start breaking down the dirt and old sealer.

Kerridge Sandstone Kitchen Floor During Cleaning Rawtenstall Rossendale

The solution was then agitated with a rotary buffer machine fitted with a coarse 200-grit diamond pad. This action released the dirt from the pores of the stone bringing it to the surface and turning the cleaning solution black. The grout was also given a scrub by hand to make sure it was as clean as possible. During the process the soiled solution was rinsed off the floor with water and then extracted with a wet vacuum as needed.

Kerridge Sandstone Kitchen Floor During Cleaning Rawtenstall Rossendale

After another rinse and extraction, the floor was given and acid rinse using Tile Doctor Grout Clean-up. This further cleans the stone and neutralises the pH level of the floor after the use of Tile Doctor Remove and Go which is a strong alkaline.

After another rinse with water and extraction with the wet vacuum a 400 and then 800-grit burnishing pad was run over the floor to refine the appearance of the stone following the use of the coarser pads earlier. Only water is used during this process to help with lubrication, and this turns into a creamy liquid which is rinsed and extracted after each pad.

Kerridge Sandstone Kitchen After Cleaning Rawtenstall Rossendale Kerridge Sandstone Kitchen Floor After Cleaning Rawtenstall Rossendale

The floor was dried as much as possible with the wet vacuum before being left to dry off fully overnight.

Sealing a Kerridge Sandstone Tiled Kitchen

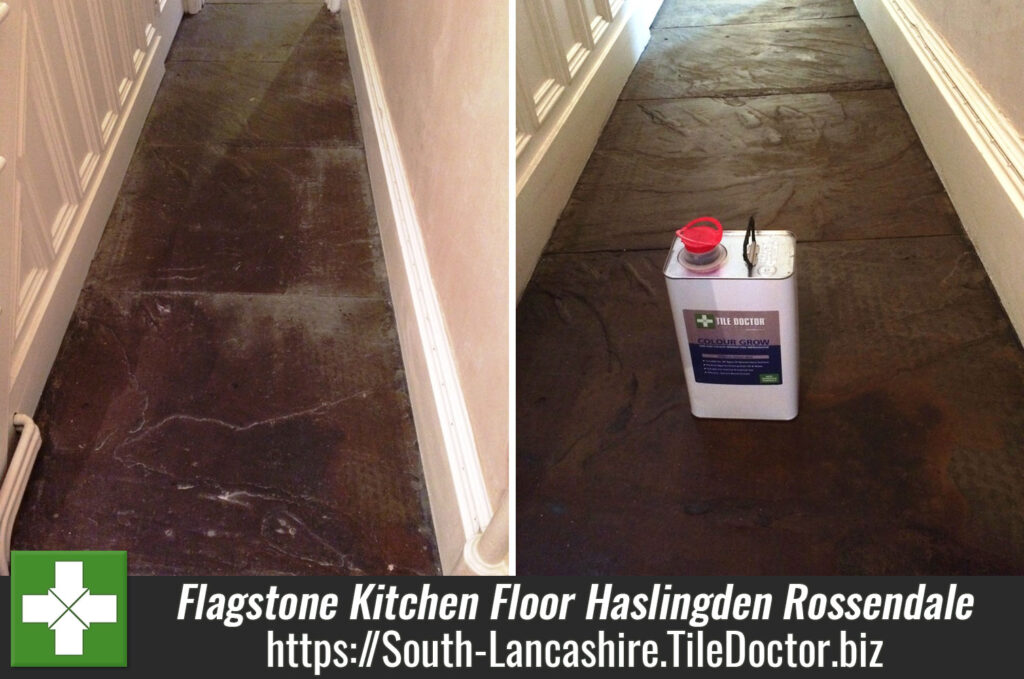
The day after the floor was tested with a damp meter to check it was dry and then sealed with Tile Doctor X-Tra Seal which is a modern oil-based product that enhances colour and adds a slight sheen appearance that really lifts the floor. This product is an impregnator that works by soaking into the sandstone occupying the pores and thereby ensuring dirt remains on the surface where it can be easily cleaned away.

Kerridge Sandstone Kitchen Floor During Sealing Rawtenstall Rossendale

Once complete the difference was extraordinary, the natural veins in the stone were now visible and the floor was completely transformed by the work, much to the pleasure of the new owner who left the following feedback:

“I have recently moved to a lovely cottage in the country, my dream, but my stone kitchen floor was not a dream when I found that it was impossible to clean with years and years of ingrained dirt. However, this is no longer the case!! My kitchen floor looks brand new and now compliments the rest of the room. I can’t recommend Kevin highly enough; he is professional and very skilled. Thank you, Kevin.”

Kerridge Sandstone Kitchen Floor After Sealing Rawtenstall Rossendale Kerridge Sandstone Kitchen Floor After Sealing Rawtenstall Rossendale

For the aftercare cleaning of Sandstone flooring, I recommend Tile Doctor Neutral Tile Cleaner which ideal for cleaning sealed stone. It has a pH neutral formula so won’t prematurely erode the sealer like many of the stronger products you find in supermarkets.


Professional Restoration of a Kerridge Sandstone Tiled Kitchen in South Lancashire

Smooth Kerridge Sandstone Tiled Kitchen Floor Renovated in Rawtenstall Read More »

Limestone Floor Cleaning and Polishing Colne

Polishing and Sealing a Dull Limestone Tiled Floor in Colne Burnley

Earlier this year I received an enquiry from Colne regarding a Limestone tiled floor that needed attention. The floor had been installed a few years earlier throughout much of the ground floor including the utility, hallway and large kitchen diner. It was last sealed by the installer and since then it had become quite soiled in parts, particularly the heavy traffic areas and grout. The client hoped for a lighter finish, with a light sheen/semi honed finish to the stone and cleaner grout.

Limestone Floor Before Cleaning Colne

The protective sealer had clearly worn down and was now letting dirt into the pores of the stone making it difficult to clean effectively. After surveying the floors, I recommended burnishing the Limestone with a set of diamond pads and then re-sealing the stone with a suitable modern sealer that would give the finish they were looking for. Happy with my quote we set a date to start the work.

Limestone Floor Before Cleaning Colne Limestone Floor Before Cleaning Colne

Cleaning and Polishing a Limestone Tiled Floor in Colne

Diamond burnishing pads are the best tool for renovating honed stone floors like Limestone and after setting up the equipment work started with the application of a coarse 400-grit pad.

Limestone Floor During Cleaning Equipment Setup Colne

The pad is fitted to a weighted buffing machine and applied to the floor at low speed with water to lubricate the process. This coarse pad strips off old sealers and cleans the stone and is run over each tile three times, once done the resultant soiling is rinsed off with water and extracted with a wet vacuum.

The burnishing process was then continued with finer 800 and 1500-grit pads which slowly restore a honed finish to the stone. After each pad is run over the floor the dirty water was extracted using the wet vacuum as before.

The next step was to scrub the grout joints using a medium dilution of Tile Doctor Pro-Clean. The solution is left to soak into the grout for ten minutes before being scrubbed in by hand with a stiff brush. Once done the now dirty solution was rinsed off with more water and extracted using the very useful wet vacuum.

The floor was then reviewed and any issues spot cleaned using a repeat of the various processes. Part of this work included hand finishing the edges and corners using a set of small hand burnishing blocks of different grits.

A lot of water was used during the cleaning process and the floor needs to be dry before applying the sealer. So once all the work was done the floor was dried as much as possible with the wet vacuum and then left to dry out for 24 hours.

Sealing a Polished Limestone Tiled Floor in Colne

On my return I set about polishing the Limestone using the last pad in the burnishing pad set which is an extra fine 3000-grit. This last pad is applied to the floor dry with only a little water sprayed onto the stone as you progress. It adds a lovely deep shine to the Limestone and leaves the floor dry and ready to be sealed.

To finish Tile Doctor Ultra-Seal was then applied to the Limestone, this is an impregnating sealer that provides a natural look finish. It works by soaking into the stone occupying the pores and thereby preventing dirt from becoming ingrained there, this ensures dirt remains on the surface where it can be easily cleaned away.

Limestone Floor After Cleaning and Polishing Colne Limestone Floor After Cleaning and Polishing Colne

The floor looked much cleaner and lighter once done and my client was very happy with the result and left the following comment on our review page:

“Thoroughly professional job from start to finish with fantastic results!”

Limestone Floor After Cleaning and Polishing Colne Limestone Floor After Cleaning and Polishing Colne

For aftercare I recommended using Tile Doctor Stone Soap for polished stone floors like this, it is a gentle effective cleaner that’s ideal for cleaning sealed floors and helps to maintain the patina.

Limestone Floor After Cleaning and Polishing Colne


Professional Restoration of a Limestone Tiled Ground Floor in South Lancashire

Polishing and Sealing a Dull Limestone Tiled Floor in Colne Burnley Read More »

Victorian Tiled Floor After Renovation Heywood

Carpet Covered Victorian Tiled Hallway Floor Renovated in Heywood

This client from Heywood reached out for some advice regarding their Victorian tiled floor that needed renovating. It was quite a large hallway and porch that needed attention and having tried cleaning it themselves they realised the tiles contained a lot of ingrained dirt that was proving stubborn to remove.

Victorian Tiled Floor Before Cleaning Heywood

They had uncovered the original Victorian floor under old carpet, and though there was some damage to the perimeter due to carpet fitting and plumbing updates etc it was broadly complete. There was also some work required in the porch due to settlement.

Victorian Tiled Floor Before Cleaning Heywood

The client had attempted to clean the floor themselves as much as they could but there was ground in dirt and staining from carpet glue and paint which meant it looked permanently unclean. In addition, it was ‘sticky’, and unpleasant to walk on due in part to unstable old sealers.

They needed a quote for someone to clean and seal the tiles properly and leave a serviceable floor that could be maintained easily. For now, repairs were to be left except for replacement of a missing piece and re-fixing a few loose tiles at the foot of the stairs.

Happy with the quote, we agreed a date for the work to start.

Cleaning and Repairing a Victorian Tiled Hallway

The first job was to re-secure the tiles by the stairs and adding the missing piece of tile that I mentioned earlier. This was followed by removing what was left of the sticky old sealer which was done using a strong dilution of Tile Doctor Remove and Go and a 50-grit diamond pad. Coarse pads are ideal for removing the ingrained patterns that carpet can leave on a tile after being covered for many years. The floor was then inspected, and any stubborn areas re-done before extracting the soiling with a wet vacuum.

Victorian Tiled Floor During Cleaning Heywood

The next job was to clean the floor using a gel cleaner called Tile Doctor Oxy-Gel. Due to the age of the property and the fact there was a cellar below, I wanted to minimise the use of water, this would also help with drying times. The gel was spread onto the floor with a little water and then scrubbed into the tiles using a 100-grit diamond pad. Once the whole floor was cleaned in this manner the soiling was extracted as before with the wet vacuum.

The last step in the cleaning process was to treat the floor to an acid wash using Tile Doctor Acid-Gel. This is another specialist Tile Doctor gel-based product that has several benefits including the further cleaning of the tiles, neutralising the PH level of the floor and countering salts which are quite common with old floors.

Victorian Tiled Floor During Cleaning Heywood

The floor was now free of ingrained dirt and staining and after a final rinse and extraction with the wet vacuum the floor was left to dry off overnight.

Sealing a Victorian Tiled Hallway

I returned the next day to seal the tiles and started by taking moisture readings from the tiles using a damp meter. This confirmed the floor was dry and ready for sealing.

I was then able to move onto sealing the floor using Tile Doctor X-Tra seal which is a long-lasting oil-based impregnating sealer that improves colour in the tile and is fully breathable, an important consideration when sealing an old floor that was previously covered in carpet. This product is also rated for external as well as internal use so its ideal for hallways which can get wet.

Victorian Tiled Floor During Sealing Heywood

Once complete the floor looked new again, much to the delight of my clients who were very happy with the work and left the following comment on our feedback system:

”Kevin was fantastic – he was so helpful and knowledgeable and made our old, tired floor look brilliant. Would 100% recommend”

Victorian Tiled Floor After Renovation Heywood

Before leaving I took time to discuss aftercare for which I recommended they use Tile Doctor Neutral Tile Cleaner, being pH neutral its ideal for the regular cleaning of sealed tiles. Many of the tile cleaning products you find in supermarkets are very strong and will strip the sealer off a floor so always read the label.

Victorian Tiled Floor After Renovation Heywood


Professional Restoration of a Victorian Tiled Hallway in South Lancashire

Carpet Covered Victorian Tiled Hallway Floor Renovated in Heywood Read More »

Sandstone Flagstone Kitchen Floor Restoration Ramsbottom

Sandstone Flagstone Floor Milled and Restored in Ramsbottom

I was invited to this 300-year-old building in Ramsbottom, Lancashire to look at restoring a Sandstone Flagstone floor. Despite some minor repairs over the years, it was now in very poor condition and after renovating the property outside and in the owners felt it was now time to tackle the floor. Having done their research, they decided to call Tile Doctor in to do the renovation.

Sandstone Flagstone Floor Before Restoration Ramsbottom

Having visited the property, I recommended milling the floor to remove years of wear and to reveal the new stone underneath. With old rough flagstones like this it is the only way to retain the character yet have a more serviceable floor that won’t shred mops.

Sandstone Flagstone Floor Before Restoration Ramsbottom

Happy with my recommendation and quote I was given the go-ahead to do the work.

Cleaning a Sandstone Flagstone Tiled Kitchen

I started work by taking notes of moisture readings from various areas, these base reading will be used later to understand if the floor has dried sufficiently for sealing.

To mill the floor, I started with the application of a very coarse 50-Grit DRB pad which was fitted to a weighted buffing machine and run over each flagstone several times using only water for lubrication. Once that step was completed the floor was rinsed with more water and the slurry extracted using a wet vacuum. The coarse pad removes a very thin layer of stone off the top of the flagstone leaving it smooth.

The floor was then cleaned using Tile Doctor Remove and Go which was scrubbed in using a 240-grit carbide brush. Again, the floor was rinsed and the slurry extracted as before.

The 50-Grit pad is very coarse, so the next step was to refine the appearance of the stone using finer grit milling. Using the same process as before a 100-grit milling pad was applied to the stone with water, rinsed off and then the floor vacuumed. Then the process repeated with the 200-Grit milling pad.

The final step of the restoration was to give the floor an acid rinse using Tile Doctor Grout Clean-up worked in with a 200-grit soft pad. Again, the floor was rinsed and vacuumed afterwards.

With the sandstone flagstones now cleaned I turned my attention to the old pointing which was also in bad shape and crumbling in many areas. This was removed and re-pointed with a modern breathable pointing product.

The floor was left to dry out and I returned a few days later to seal the floor which will protect it going forward from staining and ingrained dirt etc.

Sealing a Sandstone Flagstone Tiled Kitchen

Before applying any sealer, I took several moisture readings for the floor and compared them with the base readings I had taken at the start of the job. There were a few areas of concern, but I was able to resolve this with floor fans until the readings were acceptable.

I was then able to proceed with the final step of sealing the floor for which I used Tile Doctor X-Tra Seal. This sealer is a fully breathable oil-based sealer which improves the appearance of the stone and being breathable will cope with any moisture rising through the floor. It’s very important to use a breathable sealer on an old floor as it won’t have the benefit of a damp proof membrane. The sealer was left to dry and then the process repeated with a second coat.

Sandstone Flagstone Floor After Restoration Ramsbottom

The Sandstone Flagstones were completely transformed by the process and my clients were over the moon with their new floor, they even left the following feedback:

“Kevin has just completed our very tired stone flags. The restoration was faultless from the first consultation to the hard work he put into it and the aftercare advice was amazing. We can’t thank Kevin enough for his professionalism, fantastic knowledge, hard work and friendly manner. Our floor looks as a 300 year old stone floor should look, really really pleased, price was also reasonable and knowing Kevin used the best products too! We would highly recommend!!”

Sandstone Flagstone Floor After Restoration Ramsbottom

Before leaving I took time to discuss aftercare which for Sandstone, I recommended the use of Tile Doctor Neutral Tile Cleaner which is pH neutral and ideal for cleaning sealed stone.


Professional Restoration of a Sandstone Flagstone Tiled Kitchen in South Lancashire

Sandstone Flagstone Floor Milled and Restored in Ramsbottom Read More »

Victorian Floor Renovation Chorley

Restoration of Victorian Hallway Tiles in Chorley

Joanna contacted us with regard her late Victorian (1893) L shaped tiled hallway at their large family home in Chorley.

They had discovered the floor under carpet during renovation work some years ago and had some work done to replace damaged and missing tiles. However, the floor had not had a deep clean an and therefore much of the floor had ingrained dirt so never looked clean. Having lived with this the problem which had only got worse over time we were asked to finish the renovation.

I went over to property to survey the floor and work out a plan to restore it. Whilst there I realised the property had a cellar and was concerned that water from the vigorous cleaning process may seep downstairs resulting in staining to the ceiling. To avoid this, I realised I would need to complete the cleaning using low moisture gel-based products. Whilst there I also took several moisture readings with a damp meter which indicated that it would be best to use a fully breathable non acrylic sealer to protect the floor.

Victorian Floor Before Cleaning Chorley Victorian Floor Before Cleaning Chorley

Following the survey, I was able to work out a comprehensive plan for restoring the floor and provide the owner with an accurate quote for the work which was accepted.

Deep Cleaning a Victorian Tiled Hallway

Working in sections work commenced with a layer of Tile Doctor Oxy-Gel which was left to dwell before working it in with a low-speed weighted buffer fitted with a coarse 100-grit milling pad. The slurry generated was then vacuumed away before giving the floor a light rinse, working in small sections, and quickly vacuuming away the waste.

Victorian Floor During Cleaning Chorley Victorian Floor During Cleaning Chorley

To further clean the tiles a thin layer of Tile Doctor Remove and Go was then applied and after five minutes scrubbed in using a 200-grit coarse milling pad, vacuuming the waste away afterwards.

With the floor showing great improvement we set about tidying up the edges using a set of diamond hand burnishing blocks. A scraper and a hand brush were used to remove paint splashes, carpet adhesive and dirt already loosened by the main clean. This was followed with the application of a 400-grit burnishing pad, again working in small areas to minimise water getting into the floor

Last step of the restorative cleaning process was to treat the tiles to an acid rinse using Tile Doctor Acid Gel. This was allowed to dwell for around five to ten minutes before being worked in with a Black scrubbing pad. The acidic nature of the product neutralises the alkaline cleaners used earlier and dissolves alkaline salts built up in the tiles which is a common problem on these older floors. The soiled solution was extracted as before and rinsed thoroughly with cloths and water to minimise moisture levels, vacuuming away the waste as I went.

The floor was allowed to dry thoroughly, and a damp meter reading confirmed the moisture levels back to where they started. A quick dry burnish using an 800-grit burnishing pad with dust vacuumed away was the final preparation before sealing could commence.

Sealing a Victorian Tiled Hallway

After testing sealers, the preference was to revive the colours in the tile and give the floor a subtle sheen. Based on this I applied Tile Doctor X-Tra Seal which was ideal for as first coat revived the colours in the tile and the second coat added a very subtle sheen finish.

Victorian Floor During Sealing Chorley Victorian Floor During Sealing Chorley

After allowing the floor to partially dry, a light burnish with a soft white pad was the final part of the process.

Joanna stated she was very pleased with the results, and we discussed aftercare using Tile Doctor’s pH Neutral cleaner to prolong the life of the sealer. She also later gave a 5 Star review along with the following comment:

“Kevin was excellent. He responded promptly to my enquiry and answered all my questions. Delighted with my lovely clean floor!”

Victorian Floor After Sealing Chorley Victorian Floor After Renovation Chorley


Professional Renovation of a Victorian Tiled Hallway in Lancashire

Restoration of Victorian Hallway Tiles in Chorley Read More »

Victorian Hallway Floor Restoration Wigan

Restoration of Victorian Tiled Hallway in Wigan

Lyndsey and Mick from Wigan contacted Tile Doctor earlier this year after uncovering a beautiful Victorian tiled floor in their hallway. Keen to have it restored as an original feature they requested a quote to get a restorative deep clean, some minor essential repairs and sealing.

Victorian Hallway Before Restoration Wigan

I went over to the property to survey the floor and provide a quote for its restoration. I could see that the previous owners had glued carpet and underlay directly onto the tiles and though the new owners had managed to get a lot of that off there were some stubborn areas remaining. On top of that the tiles were very grubby and in need of a good deep clean. Finally, some loose tiles needed fixing, and they wanted the worst of the broken tiles sorted whilst retaining as much original floor and character as possible.

Victorian Hallway Before Restoration Wigan Victorian Hallway Before Restoration Wigan

After discussing expectations, it was agreed to accept the history and disturb the original screed and fixed tiles as little as possible simply re-fixing where needed, replacing the missing and shattered ones, then cleaning and sealing to give an attractive, serviceable and useable floor in keeping with the age of property.

The quotation was to carry out a deep restorative clean of the hallway tiles to remove heavy soil and strip old sealers using both low moisture gels and a weighted low speed mechanical buffing machine fitted with suitable pads. All soiled gel being removed with a wet vacuum system. The edging was to be hand finished as necessary and the floor is then to be neutralised to prepare for sealing. The hall had a small number of broken/loose tiles that are to be reset or replaced (precise details to be provided by client). Once fully dry the floor would be protected with a breathable sealer to protect and enhance the floors colours.

Happy with the detailed quote and much encouraged that their hallway floor was going to be restored the quote was accepted and a date set for the work to begin.

Cleaning and Repairing a Victorian Tiled Hallway

Having unloaded our equipment, we started the cleaning process with the application of a strong dilution of Tile Doctor Remove and Go. This product is a coatings remover which will breakdown the glue and other contaminants. It was left to soak into the tiles for ten minutes before carefully scraping the worst of the glue off with hand scrapers.

Victorian Hallway Restoration Equipment Wigan

This work continued with a 100-grit soft milling pad fitted to a weighted buffing machine running at slow speed. A wet vacuum was used to remove the waste generated and then it was followed up with an application of Tile Doctor Oxy Gel. This product was allowed to dwell for a little longer before buffing with a 200-grit soft milling pad and extracting as before.

Victorian Hallway During Restoration Wigan

The pads can struggle to reach into the perimeters so the edges and corners were cleaned by hand with diamond blocks as needed. Again, vacuuming away the waste afterwards.

Next, the floor was treated to an acid rinse using Tile Doctor Acid Gel to further clean the tiles and neutralise the floor after the use of alkaline cleaning products. As before it was left to soak in for a short time before being scrubbed in with a black pad. The floor was then rinsed with water, working in small areas and quickly vacuuming away the waste to minimise the moisture.

Victorian Hallway After Cleaning During Drying Wigan

Next, the floor was dried before carrying out a small number of tile resets and some repairs to the doorway. The floor was then left to dry off overnight.

Sealing a Victorian Tiled Hallway

The following morning, I wanted to make sure the tiles were dry enough to take a sealer so several moisture readings were taken with a damp meter to confirm. The readings were fine so we were good to go.

The Victorian tiles were then sealed with Tile Doctor X-Tra Seal with the sealer applied in sections working through the hallway until complete. X-Tra seal is an oil-based impregnator that improves colour and works well on Victorian tiles, its also rated for external use so ideal for hallways.

Victorian Hallway After Sealing During Drying Wigan

Once touch dry a second coat was applied to give the floor a nice sheen. The final step was to gently buff the floor using a white pad to remove excess sealer and bring up the appearance. A couple of hours later we inspected the floor before leaving a very happy customer.

Lyndsey commented:

Great work, just finished sealing our floor, but it looks fantastic already. Kevin has been very informative along the way as well and I would recommend him, and this company, to anyone else who is thinking of having similar work.

For aftercare of sealed Victorian tiles, I recommend Neutral Tile Cleaner, it’s a gentle yet effective tile cleaner that’s safe to use on sealed tiles.


Professional Restoration of a Victorian Tiled Hallway in Lancashire

Restoration of Victorian Tiled Hallway in Wigan Read More »

Flagstone Kitchen Floor Resurfaced Blackburn Lancashire

200-Year-Old Flagstone Floor Resurfaces and Restored near Blackburn

This house in Blackburn used to be used as an Old Mill 200 years ago and given the poor condition of the flagstone floor I suspect it was the same age. You can see from the photos below the rough state the Flagstone was in and I could see even a deep clean and seal wouldn’t do them justice.

Flagstone Floor Before Restoration Blackburn Flagstone Floor Before Restoration Blackburn

High pressure water cleaning on an old floor like this without a damp proof membrane in place would have caused damp issues especially in the winter months. The client has considered having the floor sand blasted but they had a young baby, and the dust would have got everywhere.

Flagstone Floor Before Restoration Blackburn

Clearly another option was required and fortunately we had the solution.

Resurfacing a 200-Year-Old Flagstone Kitchen Floor

Our plan was to resurface the stone by grinding away the top layer with very coarse pads to reveal an uncontaminated surface underneath. We call this process milling and it requires a special set of Diamond pads fitted to a weighted rotary machine using only water for lubrication. The water also captures the dust that is generated as the stone is resurfaced and makes cleaning much easier.

It is however hard work and starts with the application of a very coarse 50-grit DRB pad and then moving onto a 100 and 200-grit DRB pad slowly refining the stone’s appearance until you are left with a smooth fresh surface. The water turns into a slurry due to the dust and is vacuumed off the floor after the application of each pad. On this occasion I used applied a strong dilution of Tile Doctor Remove and Go as the last pad was run over the floor to make sure the surface was free of any contaminates that may have soaked into the stone over the years.

Flagstone Floor During Restoration Blackburn

Following the milling process the old loose lime-based pointing was carefully knocked out and then replaced with a new breathable flexible pointing product which adheres well past standard grout and holds fast without cracking.

Sealing a 200-Year-Old Flagstone Kitchen Floor

The next day the floor was dry and ready to be sealed. For this we used two coats of a fully breathable sealer called Tile Doctor X-Tra Seal which brings out the colour and transforms the stone, it adds a little bit of a sheen to the stone as well. X-Tra seal is a very modern oil-based sealer penetrates the pores of the stone and copes very well on floors that have no damp proof membrane, its even recommended for external applications.

Flagstone Floor After Restoration During Sealing Blackburn

You can see the results for yourself, the stone is a lot smoother to the touch and easier to clean and even if it was sandblasted it would still be a rough finish so milling the stone was the best option for an old flagstone floor like this one.

Flagstone Floor After Restoration Blackburn Flagstone Floor After Restoration Blackburn

Once finished the floor was transformed and our client was very happy with the work we had done.

Flagstone Floor After Restoration Blackburn

One last point when caring for a sealed floor like this is it’s important not to clean the floor using strong bleach based cleaning products, even washing up liquid is too strong. It should be washed with a mild pH neutral cleaning product such as Tile Doctor Neutral Cleaner only that way will the sealer last the duration.


Professional Restoration of a Flagstone Kitchen Floor in Lancashire

200-Year-Old Flagstone Floor Resurfaces and Restored near Blackburn Read More »

Sandstone Tiled Kitchen Floor Before and After Cleaning Burscough

Deep Cleaning a Sandstone Flagstone Floor in Burscough

This customer had just moved into a lovely property in the small Lancashire town of Burscough and wanted to have the Sandstone Kitchen floor professionally renovated as it was not looking its best.

I arranged an appointment to visit the property after discussing the floor over the phone, some customers like to get a quote over the phone and although I’m happy to give someone a ball park figure I really need to see the floor in order to give them an accurate price as you simply don’t know what your going to find.

Upon inspecting the floor inspect the floor I could see the previous owner had sealed the floor with multiple layers of Varnish which is not a suitable agent for protecting Sandstone floors. The stone was the riven variety and was trapping dirt across its veins and was now proving difficult to clean, the grout had also gone black with dirt. Undeterred I did a test clean on part of the floor and the results proved promising, so we agreed a price and date to return and complete the job.

Sandstone Floor Before Renovation Burscough

Deep Cleaning a Sandstone Kitchen Floor

To deep clean the floor the sandstone flagstones were covered in a strong 1:3 dilution of Tile Doctor NanoTech HBU Remover which stands for Heavy Build-Up Remover. It was left to dwell and soak into the stone for ten minutes before being scrubbed clean using a rotary buffing machine fitted with a black scrubbing pad. The now dirty cleaning solution was then removed using a wet vacuum and then the whole floor rinsed with water.

Sandstone Floor During Renovation Burscough

I had to repeat the process on stubborn stains assisted with a steam cleaner to lift the dirt out of the pores of the stone. Once I was happy with the floor I gave it a final rinse to with water to neutralise the floor and remove any trace of cleaning products. It was then dried as much as possible with a wet vacuum and then left to dry off fully overnight.

Sealing a Sandstone Kitchen Floor

I returned the next day to seal the floor first checking it for dampness using a damp meter, the flagstones were dry, so I was able to proceed as planned. To seal the stone, I used multiple coats of Tile Doctor Seal & Go Extra which is a breathable acrylic sealer that can be used on internal and external Sandstone flagstone floors and does a nice job of lifting the appearance of the stone.

Sandstone Floor After Renovation Burscough

You can see from the final photograph that the Sandstone flagstones and grout now looks so much better. My Customer was amazed with the transformation and the floor now looks brand new, they even left the following comment on the Tile Doctor feedback system.

Extremely happy with the end result. Kamila was knowledgeable & professional. We cant recommend her enough. Paul B., Burscough


Deep Cleaning a Sandstone Kitchen Floor in Lancashire

Deep Cleaning a Sandstone Flagstone Floor in Burscough Read More »

Old Flagstone Tiled Kitchen Floor Refurbished in Haslingden Rossendale

Old Flagstone Tiled Kitchen Floor Refurbished in Haslingden Rossendale

This client had contacted us for help renovating their Flagstone hallway floor as nothing they did was helping to keep them clean. The problem with the tiles was due to the pores of the flagstone being ingrained with dirt and once this happens they are really difficult to clean effectively. This is why we always recommend stones floors are sealed after cleaning.

After a successful survey that included measuring background moisture levels and testing different products for stain removal I was able to work out the best process for cleaning the floor and a day to clean and seal the tiles was scheduled.

Flagstone Hallway Floor Before Cleaning Haslingden

Deep Cleaning Flagstone Hallway Tiles

I’d established during my earlier testing that I would need a very strong cleaning product to get the floor clean and deal with the stubborn staining that was present and with that in mind I applied Tile Doctor NanoTech HBU. HBU stands for Heavy Build-Up and is a problem solving tile cleaner and stain remover that adds nano-sized abrasive particles to the mix. This was left to dwell on the floor for a few hours and additionally was covered with a plastic sheet to prevent it from drying out. I then gave the floor a scrub using a black scrubbing pad fitted to a rotary floor machine and a strong dilution of Tile Doctor Pro-Clean for good measure.

Once happy with the result the soiled cleaning solution was extracted using a wet vacuum and the floor given a thorough rinse with water to remove any trace of cleaning products. Again the wet vacuum was used to remove the fluids and extract as much moisture from the stone as possible. The floor was then left to dry out fully overnight assisted with a floor dryer to help accelerate the process.

Flagstone Hallway Floor After Cleaning Drying Out Haslingden

Sealing a Flagstone Tiled Kitchen Floor

We came back the next day and tested the floor with a damp meter in a few different locations to make sure no dampness remained in the stone. The air mover had done its job and the Flagstones were dry so we proceeded to seal the floor with a couple of coats of Tile Doctor Colour Grow which penetrates into the pores of the stone protecting it from within and enhancing the natural colours of the stone.

Flagstone Hallway Floor After Cleaning and Sealing Haslingden
It’s difficult to appreciate from the photographs but the customer was amazed at how much of a difference our process had made and at how much dirt we were able to remove. The flagstones were probably more then 100 years old and more aggressive machinery and cleaning products were the only things that would shift the old dirt. The fresh sealer will also ensure the floor is much easier to clean in future.

Old Flagstone Hallway Floor Cleaned and Sealed in Rossendale

Old Flagstone Tiled Kitchen Floor Refurbished in Haslingden Rossendale Read More »

Victorian Tiled Hallway Floor Renovated for a Property Investor in Burnley

Victorian Tiled Hallway Floor Renovated for a Property Investor in Burnley

A property investor contacted Tile Doctor to see if we could help renovate a property that was to be sold in few weeks’ time. To get maximum value from the investment she wanted to preserve the character and period features of the house including the Victorian Tiled Hallway floor, which as you can see from the photograph below was in need a bit of TLC!.

Victorian tiled floors and other period features have become very popular in recent years and are often discovered under hallway carpets covered in years of dirt. Fortunately, they are very resilient and with the right techniques and products can be restored back to their former glory.

Victorian Tiles Before Renovation Burnley
On our initial visit I conducted a survey of the floor to check its condition and work out the most suitable products and methods to employ to restore it. One of the main concerns we have with these old floors is damp as damp-proof membranes were not invented until relatively recently. I have a damp meter to check for this and it did indicate high moisture levels which isn’t really an issue for cleaning the floor but would restrict our choice of sealer to those which are fully breathable and allow moisture to rise-up through the tile. We agreed a price and schedule with the customer and within two weeks we were able to start the work.

Cleaning an Original Victorian Tiled Hallway Floor

The floor was in quite a state, made worse I suspect by recent restoration work by other contractors who unfortunately didn’t take as much care with the floor as the could have done.

After protecting the skirting boards and carpets with film work got underway starting by applying a strong dilution of Tile Doctor Remove and Go to the floor to strip away old sealers and other coatings. This product also helps to break down the paint stains on the surface of the tile, though I also used a handheld scraper, as well as a rotary machine fitted with a black scrubbing pad, to speed up the process. The resultant slurry was rinsed off the floor with water and extracted using a wet vacuum.

With the floor clean of coatings, the next step was to deep clean the tiles with a medium dilution of Tile Doctor Pro-Clean which is an effective Tile and Grout cleaning product that deeply cleans away ingrained stains. Again, we used a black scrubbing pad fitted to a rotary machine to make the job easier. Corners were tough to tackle with a machine, so we had to do them by hand.
The floor was given a final rinse to remove any soil and trace of cleaning product and the wet vacuum was used a final time to extract as much moisture out of the floor as possible. Upon finishing the cleaning, we left the floor for a few days, so it could dry out fully.

Dealing with Efflorescence

When we came back to seal the floor we noticed problems with white salt deposits coming to the surface of the tile a problem known as efflorescence. I had suspected this might become an issue but there was no indication of it happening before so was not overly concerned at the time. However, it meant I could not seal the floor as planned until the efflorescence had been dealt with. Fortunately salts like these can be treated and to resolve the problem I gave the floor a wipe with a solution of Tile Doctor Acid Gel which is a blend of phosphoric and hydrochloric acids in a gel form, formulated to remove grout haze (grout smears) and treat efflorescence. Once this was done the floor was given a light rinse and dried again.

Sealing an Original Victorian Tiled Hallway Floor

I left the floor to dry again for a few more days and on my return, I was pleased to see the problem had not resurfaced and I was able to complete the restoration with the application of a sealer.

To seal the tiles, I used a couple of coats of Tile Doctor Colour Grow, which is a penetrating sealer designed to soak into the pores of the clay thus preventing dirt from becoming ingrained whilst additionally enhancing the colours in the tile. The sealer really deepened the colours in the tile bringing them to life and with Colour Grow being fully breathable there shouldn’t be any issues with damp becoming trapped under the tile and causing issues later.

The customer was delighted with the results (see feedback below) and the work we did should more than pay for itself when the house goes on the market.

“Thoroughly impressed with Kamila, she was so lovely, professional and thorough! Our tiles look amazing and I was especially happy with how quick she sorted that floor out from the first email I sent. Janice M., Burnley”

Victorian Tiled After Renovation Burnley
 

Professional Restoration of an Old Victorian Tiled Hallway in South Lancashire

Victorian Tiled Hallway Floor Renovated for a Property Investor in Burnley Read More »

Old Flagstone Tiled Kitchen Floor Renovated at a Stacksteads Cottage near Backup

Old Flagstone Tiled Kitchen Floor Renovated at a Stacksteads Cottage near Backup

The pictures below were taken in the Kitchen of a charming cottage situated in the village of Stacksteads near the town of Backup, North of Manchester in the district of Rossendale. The flagstone floor was over 100 years old and the customer was unhappy with their appearance. They had tried to clean/mill and seal themselves a few years ago and had found the process hard work and very time consuming. This time round they decided to ask professional applicator at Tile Doctor for help.

Old Flagstone Tiled Kitchen Floor Before Renovation in Stacksteads Backup
We had conducted a small patch test so we could show possible results to the customer. They had also advised us that they felt the stained areas of grout was beyond cleaning and would probably need replacing. However replacing the grout would have been quite an expensive option so instead of replacing we suggested deep cleaning the grout lines during the renovation process.

Old Flagstone Tiled Kitchen Floor Before Renovation in Stacksteads Backup
The customers were happy with the results of the patch test so the job was booked in.

Deep Cleaning Old Flagstone Flooring

On our return visit we set about deep cleaning the flagstones using a strong dilution Tile Doctor Pro-Clean worked in using a Black Scrubbing pad fitter to a rotary cleaning machine. This action certainly gave the floor a good clean and removed the old sealer but some stains were proving stubborn to shift so we tried a stronger product called Remove and Go combined 50/50 with NanoTech HBU which add nano-sized abrasive particles to the mix.

We left the resulting formula to soak into the stone for a while and then scrubbed it into the floor with a stiff brush paying particular attention to the grout lines. This did the trick and so we then removed the now soiled and dirty cleaning products with a wet vacuum and washed down the floor with clean water to remove any trace of product and neutralise the floor before sealing. We then left for the evening so the floor could dry out fully overnight.

Old Flagstone Tiled Kitchen Floor During Renovation in Stacksteads Backup

Sealing a Flagstone Tiled Kitchen Floor

We came back the next day and tested the floor with a damp meter in a few different locations to make sure no dampness remained in the stone. The Flagstone was dry so we proceeded to seal the floor with a couple of coats of Tile Doctor Colour Grow which penetrates into the pores of the stone protecting it from within and enhancing the natural colours of the stone.

Old Flagstone Tiled Kitchen Floor After Renovation in Stacksteads Backup
The beautiful colours of blue and dark sand were showing after sealing with Colour Grow which is the best sealer for stone floors. Certainly the customer was very happy with the results and left the following 5 star review!

We could not praise Kamila enough. Our flagstone floor was in desperate need of some TLC. She was punctual, thorough and completely professional. Throughout the whole process she invited me to see the progress and to keep me informed of what she was doing. She also gave us good advice on how to clean and care for our stone floor. The end result is fabulous and we are absolutely delighted. We would definitely recommend Kamila to anyone.
Jo H, Bacup

Old Flagstone Tiled Kitchen Floor After Renovation in Stacksteads Backup
 

Old Flagstone Kitchen Floor Cleaned and Sealed in South Lancashire

Old Flagstone Tiled Kitchen Floor Renovated at a Stacksteads Cottage near Backup Read More »

Scroll to Top